In this tutorial, I will show you how to deploy a Next JS app on cPanel efficiently.
This is a complete breakdown as I am giving you a step-by-step process on how you can go about it all.
But before we get into the steps to deploy a Next JS app on cPanel, let’s understand what cPanel and Next JS are and better familiarise ourselves with these terms.
What is cPanel?
cPanel is a software tool that allows you to perform server-side tasks and manage your servers. It comes with a host of ready-to-use tools like File Manager, Database Manager, Domain Name Manager, CMS installer, etc.
What is Next.js?
Next.js is a React JS framework that you can use to build server-side rendering (SSR) applications, unlike the default React JS, which can only support single-page applications (SPA). Next JS brings you features that allow you to easily build SSR apps along with some of its other perks.
Now that we have gotten to know cPanel and Next JS better let’s get started and learn how to deploy a Next JS app on cPanel.
How To Deploy A Next JS App On cPanel
- First, you have to create a custom Next JS server. Create a server.js file in the root directory of your project. Then copy the following code and add it. You can use the official Next.js guide for guidance.
const { createServer } = require('http')
const { parse } = require('url')

const next = require('next')

const dev = process.env.NODE_ENV !== 'production'

const hostname = 'localhost'

const port = 3000

// when using middleware `hostname` and `port` must be provided below

const app = next({ dev, hostname, port })

const handle = app.getRequestHandler()

app.prepare().then(() => {

  createServer(async (req, res) => {

    try {

      // Be sure to pass `true` as the second argument to `url.parse`.

      // This tells it to parse the query portion of the URL.

      const parsedUrl = parse(req.url, true)

      const { pathname, query } = parsedUrl

      if (pathname === '/a') {

        await app.render(req, res, '/a', query)

      } else if (pathname === '/b') {

        await app.render(req, res, '/b', query)

      } else {

        await handle(req, res, parsedUrl)

      }

    } catch (err) {

      console.error('Error occurred handling', req.url, err)

      res.statusCode = 500

      res.end('internal server error')

    }

  })

    .once('error', (err) => {

      console.error(err)

      process.exit(1)

    })

    .listen(port, () => {

      console.log(`> Ready on http://${hostname}:${port}`)

    })

})
- Tweak the package.json file a bit to set the environment ready for production and activate the server.js file.
{
"scripts": {
      "start": "NODE_ENV=production node server.js"
}
}- Now you have completed that, it’s time to build your Next JS app. Use the npm run build or yarn run build command in your Terminal to run the build script.
- After completing the build, go to your file manager and locate your Next.js project files. Here you will find all the project files and folders. You may need to turn on visibility to display to find these files.
You should select all the files and folders you find and avoid folders with node_modules and .git and the README.md and .gitignore files. Added all the files and folders you selected in a ZIP file.
- Now, log into your cPanel. In your cPanel, go to the domain name’s root folder and upload and extract the ZIP file you had created.
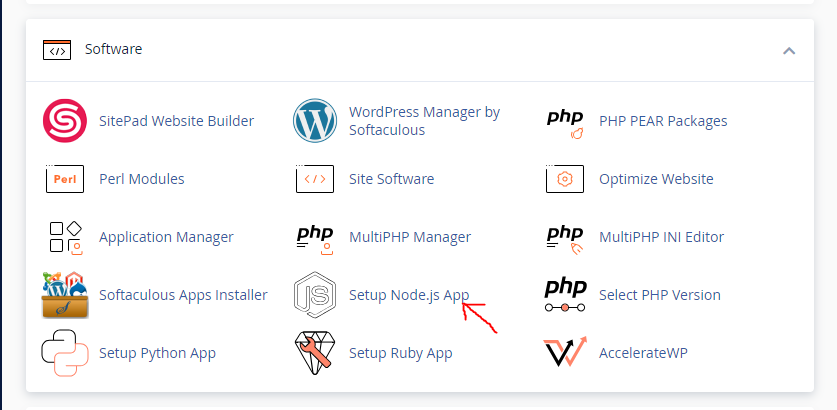
- You are all set now. Scroll down to the Software section of your cPanel. Click on Setup Node.js App.
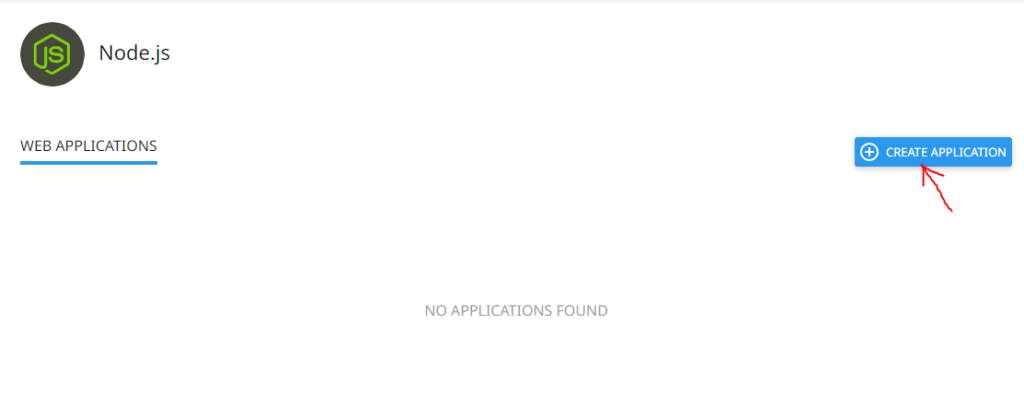
- On the setup page, click on the Create Application button.
- Set up your Node.js app. During the set-up, ensure that the Node.js version is the right version, the application mode is set to production, the application root is set to the root directory of your domain, the application URL is set to your domain name, and the startup file set to server.js.
- Once the setup is completed, click on Create.
Immediately after the app is created, it will start running automatically. Temporarily stop it from running by clicking on the STOP APP button.
Scroll down to the Detected configuration files section. Click on Run NPM Install to get all your Node.js packages installed. Then, click START APP.
Just open your domain name on your browser. Boom! Your Next.js app is live and successfully deployed.
If you have any questions, you can leave them in the comment section. I would love to hear from you. Happy coding.