Do you want to learn how to move your WordPress site to a new domain without loosing losing SEO rankings?
If you have a WordPress website that you need to move to a new domain, you may be worried about losing your hard-earned SEO rankings. Fortunately, with careful planning and execution, it is possible to move your WordPress site to a new domain without losing any SEO value. In this article, we’ll take you through the steps to move your WordPress site to a new domain while preserving your SEO rankings.
Table of Contents
Steps on How to Move WordPress to a New Domain Without Losing SEO
Moving a WordPress website to a new domain can be a daunting task, especially if you’re worried about losing your SEO rankings. However, there are a few simple steps you can take to ensure that your website’s SEO is preserved when you make the switch.
1. Backup Your Website
Before you make any changes to your website, it’s important to create a full backup of your existing WordPress installation. This will ensure that you have a copy of your website in case anything goes wrong during the transition.

There are several ways you can easily backup your WordPress site. You can use an FTP client (e.g., FileZilla) to download all WordPress files and folders to your computer and also use the phpMyAdmin tool to export your WordPress database to your computer. If you want to use a WordPress plugin, there are many WordPress plugins available to backup your site, such as UpdraftPlus, BackupBuddy, and VaultPress. These plugins can create automatic backups of your WordPress site on a regular basis and store them on a remote location like Dropbox or Google Drive.
In most cases, many web hosting providers offer backup services for your WordPress site. This feature is often included in the hosting plan or can be added as an extra service.
Regardless of the method you choose, it is important to test the backup to ensure it can be used to restore your site if needed.
2. Change Your Domain Name
Once you’ve backed up your website, you’ll need to change your domain name. This can be done through your hosting provider’s control panel. Make sure to update all of your DNS records to point to the new domain name.
To update your new domain DNS settings to point to a hosting, you will need to Log in to your domain registrar account where you purchased your domain, Locate your domain and navigate to the DNS management or domain management section. Then, Update the domain name servers (DNS) for your domain to the name servers provided by your hosting provider. This can usually be found in the hosting account dashboard or setup instructions provided by your hosting provider.
Save the changes and wait for the DNS changes to propagate. This step can take up to 48 hours to propagate, so be patient.
3. Update Your WordPress URL Setting
Once your domain name has been changed, you’ll need to update your WordPress settings to reflect the new domain name. This can be done by logging into your WordPress dashboard and navigating to Settings > General and update all of your URLs to reflect the new domain name.
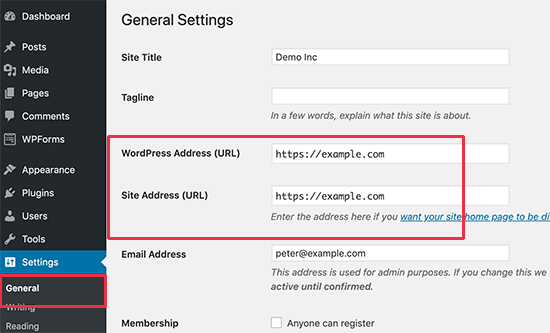
Changing the site URL in WordPress can be done by Updating the fields with the new URL you want to use for your site. Make sure to include “http://” or “https://” at the beginning of the URL. Click “Save Changes” at the bottom of the page and WordPress will prompt you to log in again to confirm the changes.
This can also be done by using a plugin such as Velvet Blues Update URLs.
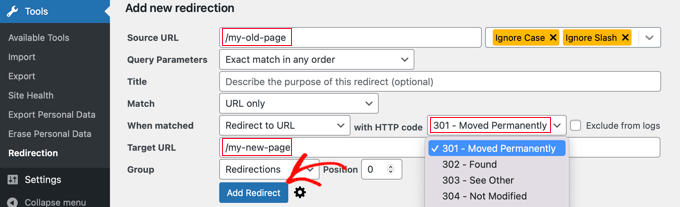
4. Redirect Your Old URLs
Once your URLs have been updated, you’ll need to set up redirects from your old URLs to your new URLs. This can be done by using a plugin such as Redirection.
Redirection is a WordPress plugin used to manage URL redirections on a website. URL redirections are used to send users from one URL to another when the first URL is no longer valid or has been changed. This can be useful for maintaining SEO rankings, correcting broken links, or directing users to a new location.
This ensures that any existing links to your site will continue to work and that search engines will update their index accordingly. Also, Contact any external websites that link to your site and request that they update their links to the new domain.
5. Update Your Sitemap
Update your sitemap and submit it to Google Search Console and Bing Webmaster Tools. Update your site URL in these consoles as well. You’ll need to update your sitemap to reflect the new URLs. This can be done by using a plugin such as Google XML Sitemaps.
By following these steps, you can easily move your WordPress site to a new domain without losing SEO. However, it’s important to note that it may take some time for search engines to reindex your site, so don’t be alarmed if there is a temporary drop in traffic or rankings.
If you liked this article, then please subscribe to our YouTube Channel for WordPress video tutorials. You can also find us on Facebook.