
All pages in WordPress have custom fields which contain their own metadata, which includes important information such as the title, description, etc.
WordPress itself uses specific fields to add this data automatically, however, we can also add our own metadata by configuring custom fields in WordPress.
To achieve this, we can do it using a plugin or, as we have been accustomed to most of the time, manually by adding the necessary code ourselves.
What are WordPress custom fields?
Let’s start by talking about what custom fields are to avoid getting lost.
A field is an element through which information can be added. These can be of different types and forms, such as a list of checkboxes, dates, numbers, text, range slider, etc.
Whatever the case, the information we add using these fields can have endless purposes, although, most of the time, the information will be used as metadata.
Some types of metadata include tags, meta descriptions, categories, etc., although one thing they all have in common is that WordPress already provides those fields, so we can add that content.
Let’s take an example, and identify some metadata that WordPress itself already includes.
Let’s analyze the WordPress posts a little. We could find the metadata title, description, featured image, etc. They are considered metadata because they allow us to add information. Do not forget this point, it is very important.
In some cases, we will need to add new metadata, which WordPress does not include by default.
And that is where the custom fields come in, as they will allow us to enter the information we need so that we can associate it with our content.
Finally, we would like to emphasize that Custom Fields and Custom Post Type are not the same.
Custom Post Types, on the one hand, correspond to a type of content that has a special format, while Custom Fields are fields that will allow us to add new metadata.
Normally, these Custom Fields that we have created are usually associated with the Custom Post Type, although they can also be used separately, without depending on any type of content.
Add Custom Fields using a plugin
There are endless plugins that will allow us to add custom fields to our WordPress. However, on this occasion, we will use the plugin called Advanced Custom Fields, which we can download for free from the WordPress repository itself.
Once we have it downloaded, installed, and activated, we will click on custom fields, and then we will add a new group by clicking on add new.
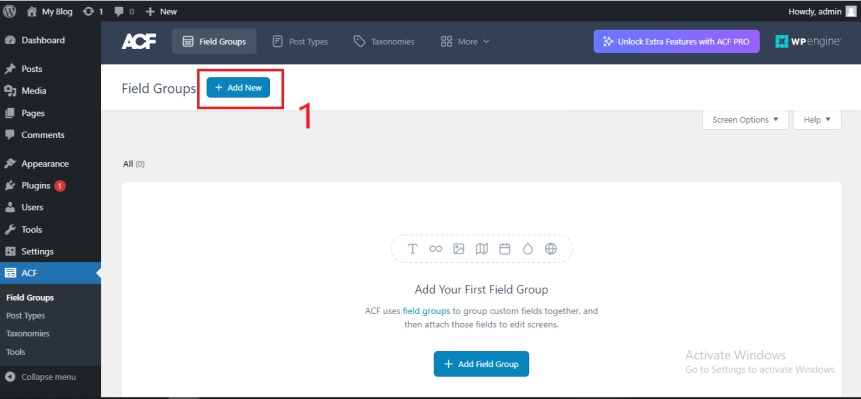
Next, we will see a window like the following:
Before analyzing the options presented to us, we will put you in context a little: in the previous article, where we talked about what WordPress custom post types are, we used as an example that on our site we wanted to add series of all kinds but that, we would not use the entries because we are interested in adding extra information such as the number of seasons and the score that the series in question has, and, due to these characteristics, we could not consider the series as entries.
For this reason, we decided to create a type of custom post, but until now we had not started to add those two new characteristics that would differentiate it from the entries, because, as you already know, we need the WordPress custom fields to add those two metadata.
Now yes. Looking at the previous image, we can see that we have several options.
If we look at them from top to bottom, the first thing we can find is the name of our custom field group, which will be required. Although it does not appear in the image, we decided to name it “Series”.
The next thing we can see are the custom fields that we have added to that group. On this occasion, remember that we only needed two fields: the score and the number of seasons, so we do not need to add more fields.

To add a field, you just have to click on the add field option, and a window similar to the following will appear:
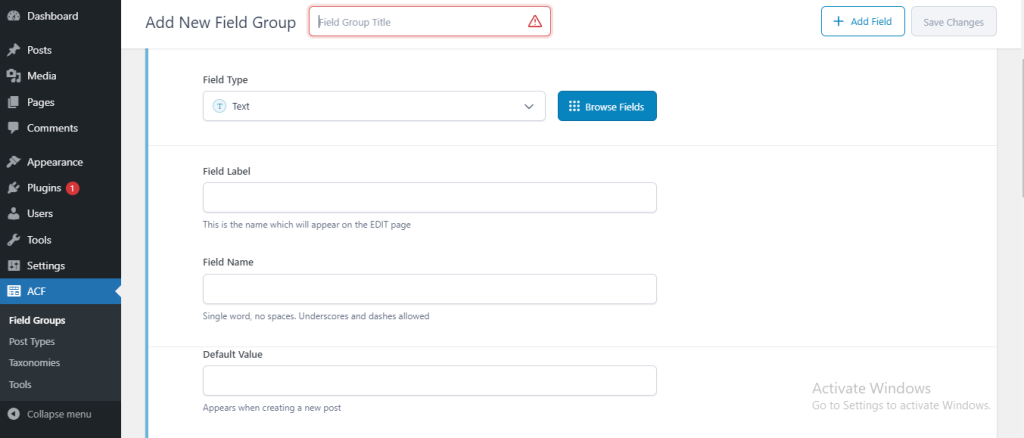
Let’s see what each of the options does in a little detail:
- Field label: It is the name that will appear visually and that will allow us to distinguish it from the rest of the custom fields.
- Field name: It must be a single word, you can use hyphens and underscores. It is like the slug of the field, and we will need it when making a query, therefore, we will refer to it by this name.
- Field type: What type of information will this field contain? It can be of any type: text, numbers, emails, links, checkboxes, etc.
- Instructions: They appear below the field label and allow us to give a brief description of our field.
- Required: Indicates whether the field is required or not. If so, it must be checked to be able to save/publish the content.
- Default value: Allows you to add a value if one is not given.
- Text marker: Text that will appear inside the field if no value has been entered (placeholder).
- Prepend: By placing the name of another field, it will appear before it.
- Append: Placing the name of another field, will appear after it.
- Minimum value: Allows you to add a minimum value to the field.
- Maximum value: Allows you to add a minimum value to the field.
- Conditional logic: Allows you to add one or more conditions to the field.
- Container attributes: It will allow us to add a class or an identifier to the container, in addition to the possibility of giving it a width in percentage.
Once this part has been explained, we return to the previous one:
The next section we find is the Location section, in which we can indicate where our custom fields are going to be displayed. For this article, as we said previously, we will follow the example of the series, so we will make them appear only in that section…
In the last option, settings, we see a series of options that can be used to modify our group. On this occasion, we will leave them as they are and click on publish to save our group and custom fields.
If everything has gone well, by accessing the Series section and adding or editing one, we will be able to see the following:
And there they are, the series group with the previously created custom fields: seasons and score.
Very good, we now have our custom fields created and working, although they will only be visible from our administration panel. If we want our users to also be able to see this data, we will have to modify the theme file in which we want the information to appear.
To do this, we will use the “get_post_meta” function , which follows the following structure:get_post_meta( $post_id, $key = ”, $single = false );
Let’s see what each of its parameters does:
- $post_id: ID of the current post.
- $key: The meta key that we want to receive. If one is not specified, it will obtain all those associated with the post we are in (according to the id).
- $single: If true, it will return the first value of the meta key that we specify. If in the previous parameter, we have specified one in particular and not all, the value must be true.
The code we have used to add the fields is the following:# We are going to display HTML, so remember to close the PHP syntax if you want to write a <p> tag ?> <p>Seasons: <?php echo get_post_meta( get_the_ID(), ‘seasons’, true); ?></p> <p>Score: <?php echo get_post_meta( get_the_ID(), ‘score’, true); ?></p>
Depending on the theme we are using, we will have to place the code in one part or another, although the part in which we want to place the information received from our fields will also influence it.
Because we must edit the files of our theme, we recommend that you create a child theme and edit its files, this way, in the case of updating the parent theme, the data will not be lost.
Add Custom Fields manually
Next, we will create our own custom fields without using any plugins.
To do this, we will modify the functions.php file of our active theme, so it is totally recommended, if not mandatory, to make a backup copy of it before starting to modify it.
If you already have your backup ready, let’s start creating the custom fields.
First of all, we will create the custom fields that we are going to create. To do this, we will use the “register_meta” function that WordPress itself offers us and which follows the following structure:
register_meta( $object_type , $meta_key , $args , $deprecated = null )
Let’s see what each of the parameters is:
- $object_type: Meta box object type. For example, if we want the fields to appear in all entries, we can leave it as a post, and if we want a custom post, we must write the custom post we want.
- $meta_key: Meta key that we want to register.
- $args: Data used to describe the meta key when registered.
Next, and using the previous function, we will create a meta data. The code for our metadata is as follows:add_action(‘init’, ‘series_register_fields’); function series_register_fields() { register_meta(‘series’, ‘series_seasons’, ‘sanitize_text_field’); register_meta(‘series’, ‘series_score’, ‘sanitize_text_field’); }
Well, we already have our fields created, now it is our turn to create a group and introduce these goals into this group. To do this, we will use the “add_meta_box” function which follows the following structure:
add_meta_box( $id , $title , $callback , $screen = null , $context = ‘advanced’ , $priority = ‘default’ , $callback_args = null )
Let’s see what each of its parameters does:
- $id: Allows both letters and numbers and will be used to uniquely identify the meta box section.
- $title: Allows you to indicate the name that our meta box will have.
- $callback: Function that will be executed and that will display the HTML code that will go inside our meta box.
- $screen: Allows you to indicate what type of content our meta box will be displayed on. The possible values are post, page, or custom-posts (the name of the custom post).
- $ context: Indicates the position in which our meta box will appear. It can take the values: normal or advanced, in case we want it to appear in the same column of the editor or side if we want it to appear on the side.
- $priority: Used to indicate the height where the meta box will appear, although it will depend to a certain extent on the plugins we have. Its value can be: core, low, high, or default.
- $callback_args: Used to pass parameters that will be used within the function that we use in the callback parameter.
The code we have used is the following:add_action(‘add_meta_boxes’, ‘series_meta_box’); function series_meta_box() { add_meta_box( ‘series-meta-box’, __( ‘Additional information – Series:’, ‘series_textdomain’ ), ‘series_meta_box_callback’, ‘series’, ‘normal’, ‘high’, array( ‘arg’ => ‘value’ ) ); } function series_meta_box_callback($post) { echo ‘Hello world’; }
If everything has gone well, we will now have our box available, but, as you can see, it lacks options to enter data and only shows a message that says “Hello world.”
To add the changes and allow these changes to be stored in the database, we must enter the following code in the series_meta_box_callback( $posts ) function:function series_meta_box_callback($post){ ?> <label for=”series_seasons” class=”label”>Number of seasons:</label> <input type=”number” name=”series_seasons” id=”series_seasons”> <label for=”series_score” class=”label”>Score:</label> <select name=”series_score” id=”series_score”> <option value=”1″>1</option> <option value=”2″>2</option> <option value=”3″>3</option> <option value=”4″>4</option> <option value=”5″>5</option> </select> <?php }
And now, in order to store the data, we will use the “update_post_meta()” function:update_post_meta( $post_id, $meta_key, $meta_value, $prev_value = ” )
Let’s see what each of its parameters does:
- $post_id: The ID of the current post. Typically, the is stored in the $post_id variable.
- $meta_key: Name of the field that usually matches the name of the HTML field we want to store.
- $meta_value: Value of the metadata that we are going to save.
- $prev_value: Previous value to check before updating.
add_action( ‘save_post’, ‘series_update_meta’ ); function series_update_meta( $post_id ) { if ( defined( ‘DOING_AUTOSAVE’ ) && DOING_AUTOSAVE ) { return; } if ( get_post_type($post_id) == “series” ) { update_post_meta( $post_id, ‘seasons’, $_POST[‘series_seasons’] ); update_post_meta( $post_id, ‘score’, $_POST[‘series_score’] ); } }
With the previous code, every time we save our post type we will check that it is indeed our post type series and that it has not been saved through autosave, but through the button. Finally, the data will be entered into the database.
If what you want is to add a custom field to an entry, the process is much simpler.
To create custom fields in entries, we will go to the entries section, once there, we will click on-screen options and activate the custom fields option.
Once activated, a box like the following will appear:
To add them, we must click on the drop-down menu, under name and finally click on add a custom field.
Keep in mind that the field must already exist and that with this option we can only add it to the entries.
To retrieve the values, we will do so using the “get_post_meta” function, as we did in the case of using a plugin.
WordPress custom fields allow us to add any type of metadata to our pages and posts, and there are very few things we can’t do with custom fields.
Using a plugin is not a bad option, although if we do, we will always depend on the plugin to maintain our custom posts. Adding them manually is undoubtedly the best option, as long as it is done in a child theme, although it can be a bit complicated.
And you? Do you know anything else about custom posts? If so, leave it in the comments. Remember that you can also express your doubts.