Are you interested in activating Imagick for your WordPress site?
By adjusting the default Imagick settings, you can potentially enhance your site’s performance and display higher-quality images for your visitors.
While WordPress typically utilizes Imagick automatically for image management, this article will guide you through the process of enabling Imagick on your WordPress website and customizing its settings to enhance the user experience.
What is the Role of Imagick Software in WordPress?
When you interact with images on WordPress, whether uploading, editing or displaying them, the platform works behind the scenes to optimize them. The optimization process ensures that your images are of high quality and load quickly.
WordPress utilizes Imagick or GD Library by default to carry out these optimizations. These are libraries that comprise pre-written code that anyone can use. They enable WordPress to create, display, convert, and edit images.
In addition, WordPress employs these libraries to resize and crop images, compress image files, and convert them into different formats. With these libraries, you can also customize images by modifying the contrast, adjusting brightness levels, or adding text and watermarks.
Although both Imagick and GD Library are comparable, Imagick offers some advantages over GD Library. Imagick supports over 200 image formats and usually results in higher-quality images. Therefore, WordPress prefers to use the Imagick library when available on the server.
In general, Imagick is used by WordPress by default whenever possible, so there’s usually no need to be concerned about it. However, since Imagick tends to create higher-quality images, it may increase the file size of your images. This can potentially slow down your website, especially if you have many large, high-resolution graphics.
A slower website negatively impacts your WordPress SEO, and it also provides a poor user experience, which can lead to lower conversion rates and sales. Thankfully, there are several ways to improve the speed and performance of your WordPress website, including tweaking your Imagick settings.
On the other hand, some websites may have the opposite issue. Content creators such as artists or photographers may want to display the highest-quality images to visitors, even if it comes at the expense of site speed. Despite the fact that Imagick usually produces sharper images compared to GD Library, it may still optimize images in a way that negatively affects their quality.
Regardless of whether you prioritize site speed or image quality, there is no native method to alter how Imagick handles your images. However, you can determine whether Imagick is installed and enabled on your website and customize its settings using a free plugin.
How to Activate Imagick on Your WordPress Site
One of the simplest ways to customize Imagick is by utilizing the ImageMagick Engine plugin. This tool enables you to modify how Imagick handles your images, such as optimizing the image size to enhance your website’s loading speed.
Furthermore, this plugin allows you to effortlessly enable or disable Imagick on your server, which is particularly useful if it is not already activated.
To begin using the plugin, you must first install and activate it. If you require assistance, please refer to our guide on installing WordPress plugins.
After activating the plugin, navigate to Settings » ImageMagick Engine. If ImageMagick Engine is not enabled, a warning message will appear at this point.
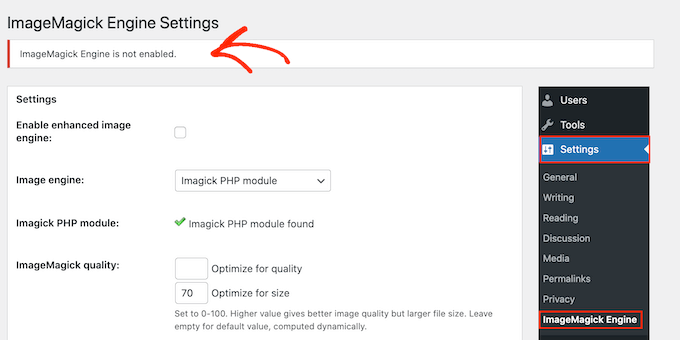
To activate Imagick, tick the box next to ‘Enable enhanced image engine’ and click ‘Save Changes.’ This will remove the ‘not enabled’ warning and allow you to customize the Imagick settings. On this page, you’ll see all the image types that WordPress supports, such as thumbnail, medium, and large.
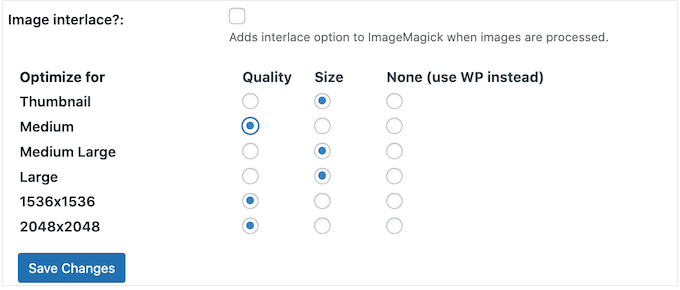
For each image type, you can choose whether ImageMagick Engine should prioritize quality or size. You can experiment with quality/size settings by entering any number between 0-100 into the ‘Optimize for quality’ and ‘Optimize for size’ boxes.
A higher ‘Optimize for quality’ value will result in sharper, higher-resolution images but may also increase the file size. If you’re unsure, leave these boxes empty and ImageMagick will assign the best values automatically.
Once you’re satisfied with the plugin settings, click ‘Save Changes.’ By default, ImageMagick will apply these settings only to new images uploaded to the WordPress media library. If you want to update existing images, check all the boxes in the ‘Regenerate Images’ section and click ‘Regenerate.’
How to Install the ImageMagick PHP Module on Your Server
If you encounter an error stating ‘ImageMagick PHP module not found,’ it indicates that the ImageMagick module is not installed on your server. If you do not have server access, you must contact your server administrator to have the module installed for you.
However, if you have server access, you can install the module yourself. The procedure for installing a new module varies depending on your hosting provider. Nevertheless, most reliable WordPress hosting providers offer comprehensive documentation on customizing the server. Therefore, it is advisable to review their support guides and website for more information.
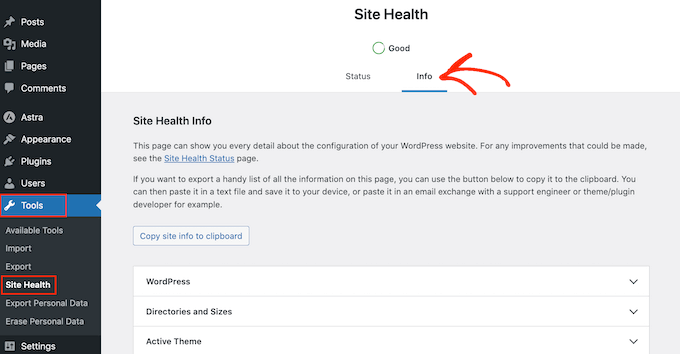
The modules you need to install will vary depending on the PHP version installed on your website. To find your PHP version, navigate to Tools » Site Health on the WordPress dashboard, then click on the ‘Info’ tab.
If you liked this article, then please subscribe to our YouTube Channel for more WordPress video tutorials. You can also find us on Facebook.