PHP error logs are a valuable resource for troubleshooting web hosting issues. Unexpected behavior in WordPress and other PHP applications is frequently difficult to isolate. PHP error logs, including WordPress logs, can assist you in identifying issues and locating the offending plugin, theme, or custom code.
In this article, we’ll explain what PHP error logs are and why they’re useful, before showing you how to activate and configure both WordPress logs and the PHP runtime’s logging functionality using cPanel and WHM.
What is a PHP Error Log?
A PHP error log contains a list of warnings and error messages generated by the language runtime and saved to a file. Because WordPress is written in PHP, it handles error messages and logging.
Errors occur for a variety of reasons. A line of code may contain a typo, or the code may be correct, but something unexpected occurs when it is executed. In any case, the developers want to notify you, so they write code that logs a message to a file. Error logs are a chronologically ordered list of these messages.
Error logs are extremely useful for determining why WordPress isn’t behaving as you expect it to. The logs can tell you why it’s using too many server resources, a plugin isn’t working, or pages aren’t loading. If you’re experiencing a “White Screen of Death” and WordPress isn’t responding, the logs may be the only way to figure out what’s going on.
How to Monitor WordPress Logs in cPanel
Before you can use logs to troubleshoot, you must first instruct WordPress or PHP to begin logging. Because logging consumes server resources, error logs are disabled by default. They can also pose a security risk if they are seen by the wrong person; logs can contain information about potential vulnerabilities.
We’ll look at two methods for configuring error logging in cPanel. They are as follows:
- Using the wp-config file to enable WordPress logging.
- Using the php.ini file to enable PHP logging.
Both can be accomplished quickly in cPanel and WHM.
WordPress Error Logs with Wpconfig.php
The wp-config.php file contains WordPress’s configuration, and, with a couple of lines of code, you can turn on debugging mode and tell WordPress to write errors to a log.
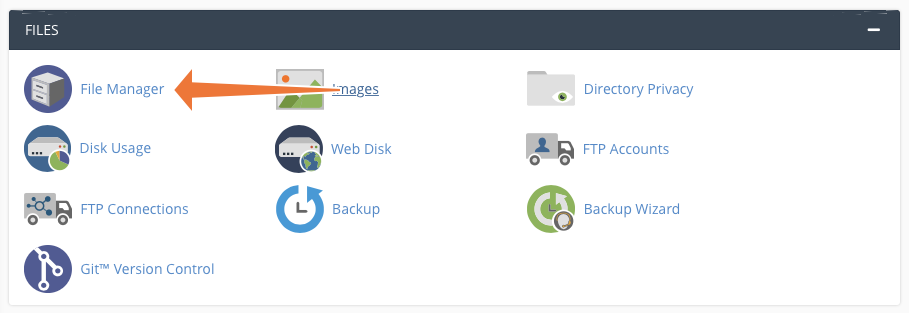
First, launch cPanel’s File Manager, which can be found in the Files section of the main page.
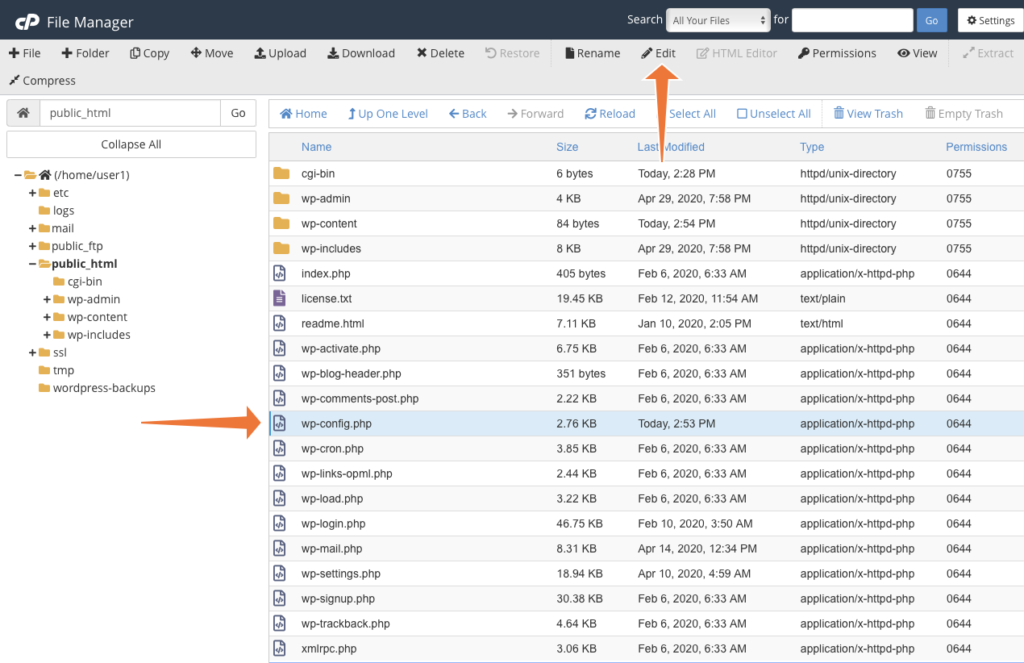
Your WordPress site is most likely in the root or a subdirectory of public html, but it could be somewhere else if your server is configured differently.
Click on the directory containing the site and find the wp-config.php file in the right-hand pane. Select it and then, in the menu bar, click Edit.
The file is opened in the text editor in cPanel. Scroll to the line that says:
/* That's all, stop editing! Happy blogging. */Add the following code above that line, then save it:
define( 'WP_DEBUG', true );
	define( 'WP_DEBUG_LOG', true );
	define( 'WP_DEBUG_DISPLAY', false );
@ini_set( 'display_errors', 0 );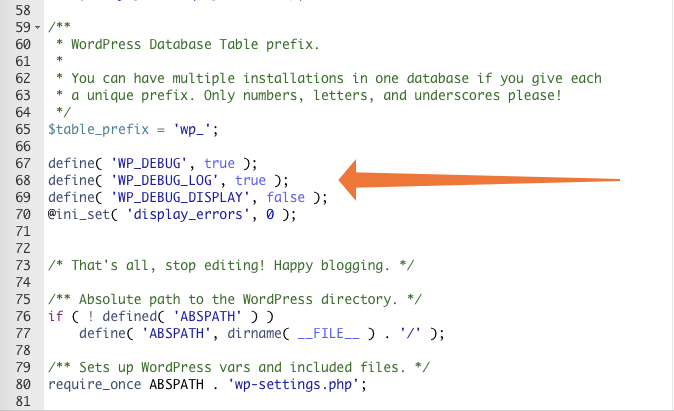
We’re instructing WordPress to enable debugging and write error messages to the log file. We also instruct it not to display errors in the interface, as this is not appropriate for a production website.
WordPress will now log error messages to a file called error.log in the wp-content directory, which is in your WordPress site’s root directory.
You can view the error messages by opening this file in the cPanel File Manager and using a text editor. The file’s most recent messages are at the bottom. They inform you of the type of error and the code that caused it, allowing you to locate the plugin or theme file that is to blame.
When you’ve determined the source of the problem, remove the logging code you added to the configuration file. The error file will continue to grow and will eventually consume a large portion of your disk space.
How To Log PHP Errors Beyond WordPress
The method described above is excellent for managing logging in WordPress, but what if you want to log errors for other content management systems and applications?
To enable widespread logging, add code to the php.ini file, which can be edited using cPanel’s MultiPHP INI Editor. This file can only be edited if your web hosting environment allows it.

Choose the Editor tab, then a location from the dropdown menu. cPanel shows the current configuration file, which may be empty.
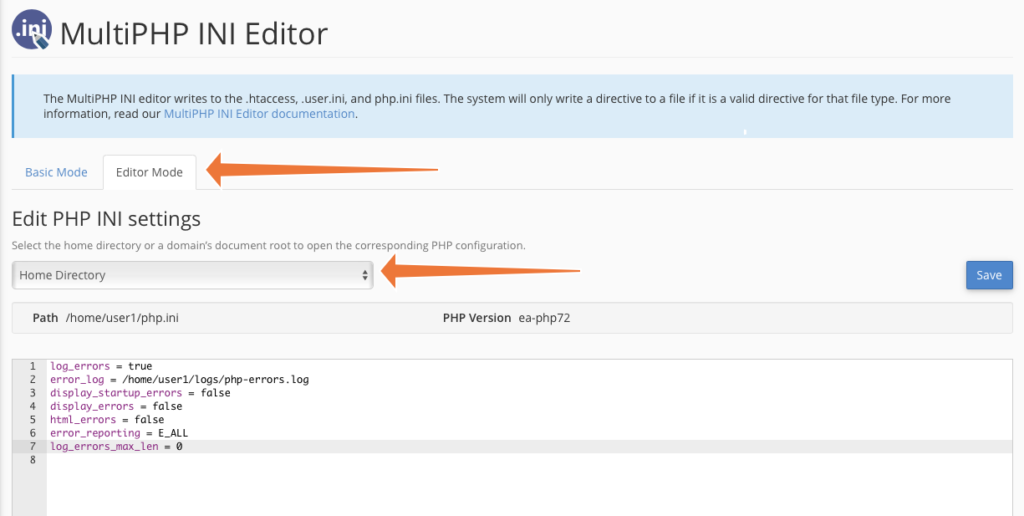
Add the following to the text entry field and click Save.
log_errors = true
error_log = /home/user1/logs/error.log
display_startup_errors = false
display_errors = false
html_errors = false
error_reporting = E_ALL
log_errors_max_len = 0
These directives instruct the runtime to log errors to the error log file, which should be changed to your preferred location. We disabled startup errors because they are rarely useful in debugging misbehaving applications. We also tell PHP not to show errors on web pages because we don’t want users to see them.
When you click Save, PHP will begin logging errors to the file you specified. The log can be accessed via the cPanel File Manager or by logging in with SSH.
The php.ini directives we used are suitable for most web servers, but you can configure PHP in a variety of ways.
Once you’ve determined the source of your problem using the logs, remove the code you just added or set the log errors value to false to disable logging.
Efficient Issue Resolution with PHP Error Logs and cPanel
Logs are a fantastic resource for diagnosing and correcting unexpected behavior in WordPress sites and other web applications. It’s simple to enable and disable logging in cPanel and WHM, reducing the time you spend tracking down elusive issues.