You have complete control when you host your email on your domain using an SMTP server. You can tailor your email address to your company’s or personal brand. All data is kept privately on a server or hosting account that only you have access to. There’s nothing stopping you from switching hosting providers because you’re not locked into a hosted service.
Why aren’t more people hosting their own email? It’s usually because setting up an email server without assistance is a nightmare. You must learn everything there is to know about SMTP, IMAP, Exim, mail routing, and more. If you use cPanel and WHM, however, you will have the tools necessary to quickly set up and connect to email accounts via SMTP. Sending mail through their server is as simple for most cPanel users as creating an email account and configuring their favorite app.
We’ll show you how to do just that in this article. We’ll walk you through the process of creating an email account and integrating your apps with cPanel’s SMTP settings. We’ll also go over some of the most common mistakes and how to fix them.
Table of Contents
What is SMTP?
The Simple Mail Transfer Protocol (SMTP) is the communication protocol used by applications to send email to servers over the internet. When you click “send” in your email client, whether it’s Apple Mail®, MicrosoftOutlook®, Thunderbird®, or another, it connects to a server, authenticates, and attempts to deliver the contents of its outbox. The server to which the app sends an email is known as the outgoing mail server and the software to which it connects is known as a mail transfer agent (MTA).
The server’s MTA receives messages from the app, queues them, and then sends them to the recipient’s MTA, which delivers them to their inbox. Exim, cPanel’s integrated mail transfer agent, communicates with mail clients and other MTAs via SMTP, as do all MTAs. That is why MTAs are sometimes referred to as SMTP servers.
cPanel users don’t have to worry about Exim configuration or SMTP complexities because cPanel handles the nitty-gritty details. However, if you or your users experience email errors, you may need to adjust your configuration settings.
Before we get started with troubleshooting, let’s go over the fundamentals of creating an email account on your server and configuring your email client to send messages to the MTA via SMTP.
How to Set Up SMTP in cPanel
The cPanel SMTP setup process consists of two steps:
- Create a server-side email account.
- In the email client, enter the server and authentication information for the account.
Let’s start by making a new email account. Navigate to the Email Accounts interface in cPanel, which can be found in the Email section of the main page menu.
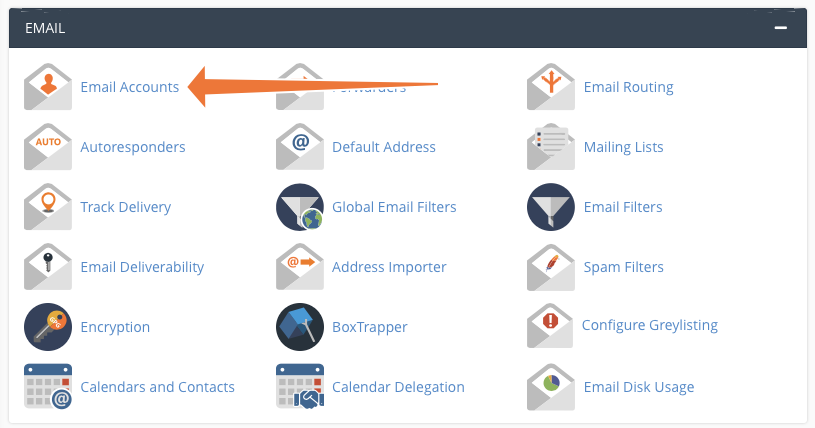
Click the “Create” button.
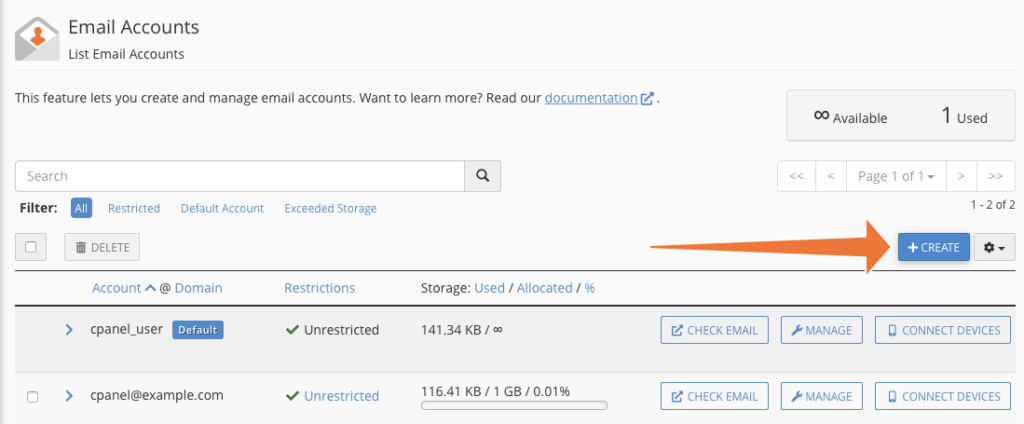
Choose a domain, a username, and a password on the next page. At the bottom of the page, click Create, and cPanel will create a new account.
The next step is for your client to be configured so that it knows which server to connect to and how to authenticate. The necessary cPanel SMTP settings can be found in the Connect Devices interface.
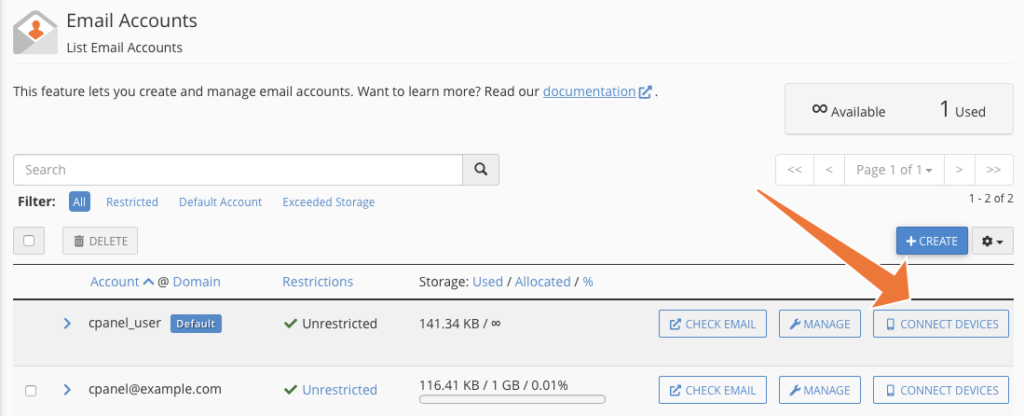
This page contains the username, URL, and SMTP port number of the outgoing server. These are the details you must provide to your app.
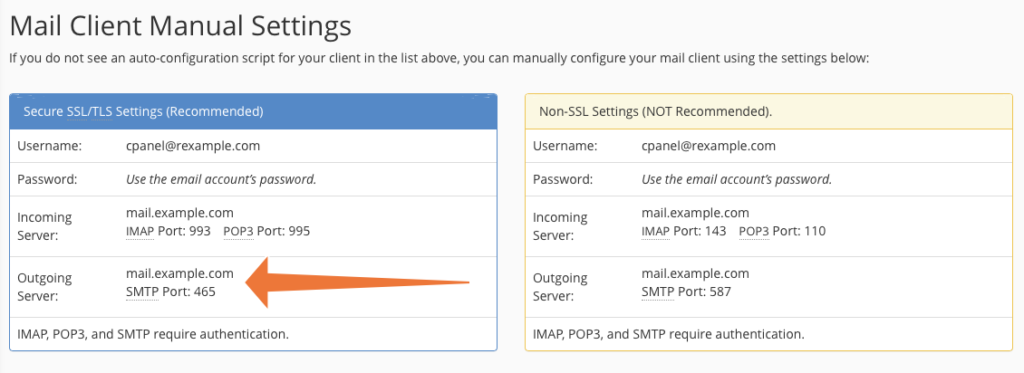
We strongly advise you to use the more secure SSL/TLS details instead of the insecure Non-SSL settings.
Troubleshooting Common SMTP Errors in cPanel
If everything goes well, you can now send messages from your personalized address through your server. However, email is complicated, and misconfiguration is not uncommon to cause authentication or mail delivery issues.
SMTP errors frequently manifest as undelivered messages. You attempt to send an email and receive a prompt response with an illegible error message and a number. The rest of this article will look at how you or your hosting provider can fix some of the most common errors.
Error 421 – Too Many Concurrent SMTP Connections
Exim limits the number of concurrent SMTP connections it allows to avoid overloading the server, but on a busy server, the default cPanel setting of 100 concurrent connections may be insufficient.
The “smtp accept max” directive in Exim’s configuration file controls the limit. In WHM, navigate to the Exim Configuration Manager under Service Configuration in the sidebar menu to change this value.
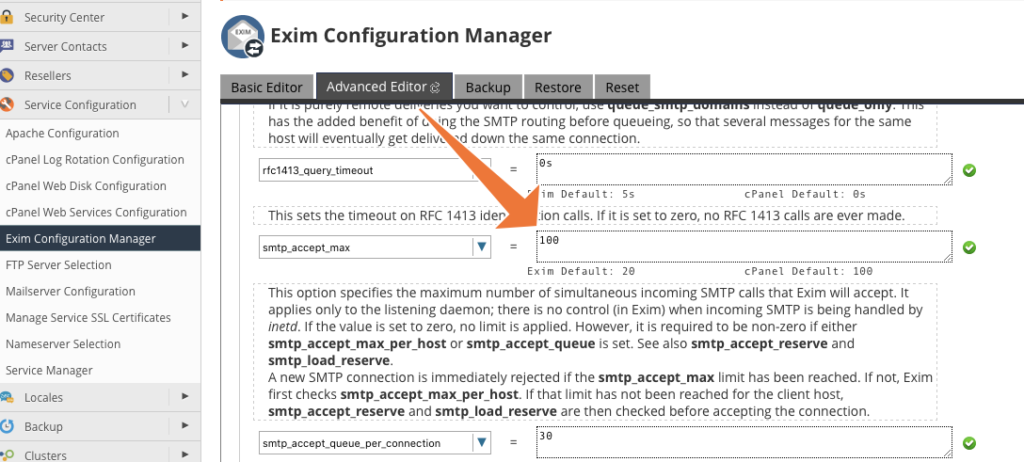
Search for “smtp accept max” in the Advanced Editor tab. Increase the value, but keep in mind that too many SMTP connections may cause the mail server to run out of memory and crash.
Error 550 – Please Turn on SMTP Authentication in Your Mail Client
When your mail client sends messages, it must provide authentication credentials via a secure connection. Your server would quickly become a haven for spammers if anyone could connect and send messages, so the client must demonstrate that it is a legitimate sender for that account.
When something goes wrong during the authentication process, you receive an Error 550 message. There are several possible causes for this error.
Misconfigured SMTP Client Authentication
Error 550 is most commonly caused by either a misconfiguration in the email client or a client that is so old that it does not know how to establish a secure SMTP connection. If only one or a few users encounter the error, this is the most likely cause.
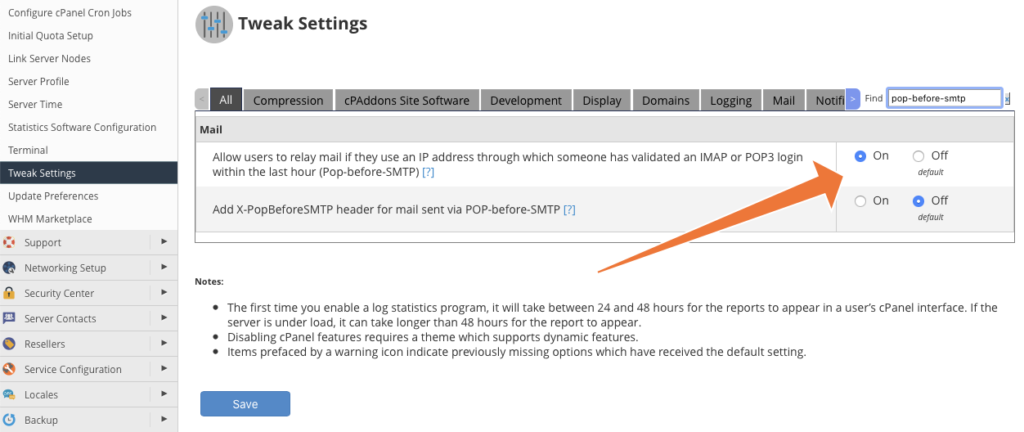
The best way to resolve it is to use a modern client with the correct authentication information. If that isn’t possible, WHM includes a configuration change that allows SMTP connections from users who have previously authenticated using POP or IMAP, the protocols used to collect messages from the server.
Navigate to the Tweak Settings interface, which is located in the WHM sidebar menu under Server Configuration. Look for “Pop-before-SMTP” and turn it on.
Incorrect Email Routing for the Domain
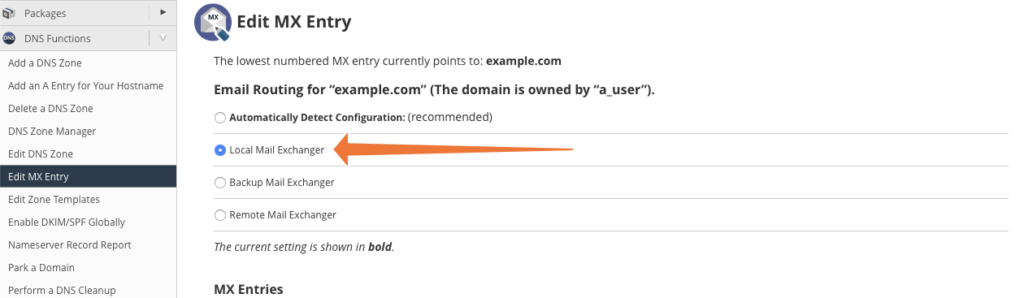
If someone receives a 550 error when attempting to send a message to an account hosted on your server, something is likely wrong with the domain’s routing configuration. This is usually because the domain is set up to use a remote mail exchanger rather than the one on your server.
To ensure that emails for the domain use the local mail exchanger, navigate to DNS Functions > Edit MX Entry in the WHM sidebar menu. Select the appropriate domain and click Edit. Check that the Local Mail Exchanger option is selected.
Another possibility is that the domain’s MX records are incorrectly configured. These are the DNS records that specify where a domain’s mail should be delivered. To see if they point to the correct IP address, use the “dig” command-line tool.

In this example, we use dig to determine where our domain’s MX records point, and then we verify that the domain name record contains the expected IP address.
Take Control of Your Email with cPanel
Email is critical to your brand’s identity and serves as a vital link between you and your customers and colleagues. When you host your own email, you have complete control over your brand and data. Setting up and managing a private email account with cPanel and WHM couldn’t be easier.